0. 开篇
Spark 的 bucket 原理上其实和 repartition 非常相似(其实对数据的操作都是一样的), 但是 Spark 的 repartition 是用来调整 Dataframe 的分区数, 而 bucketing 机制相比, 更多了以下的功能:
- 当有点查的时候, 可以 pruning 掉不必要的文件.
- 当 join 的双边都有 bucketBy 且满足一定条件之后, 可以进行 bucket join, 极大的优化 join 大-大表 join 性能(能优化掉 shuffle, 这个真的是大杀器).
以下的文章讲先介绍 bucket 的原理, 然后具体展开上面的这两点优化, 最后会讲下 bucketing 机制存在的问题.
1. 基础
bucketing 与 repartition 都是对数据里每条记录通过一个 Hash 函数计算 key(Murmur3Hash)得到一个值, 相同值的记录放到同一个分片中去.
bucketBy 的写入比较特殊, 不能直接 write.parquet, 因为需要记录一些信息到元数据信息, 在我们自己测试的时候, 可以这样写: df.write.format("parquet").option("path", "/tmp/bueket").bucketBy(3, "id").saveAsTable("tbl"), 我们 buketBy 的列是 id, 分了三个桶, 最后产生出来的文件会小于等于3个(如果 id 只有一个值, 只会有一个文件). 如下, 文件名中_后的, 就是每个文件的 buckId(也是里面记录的 hash 值).
1 | part-00000-39d128dc-69a1-4b91-8931-68e81c77c4ae_00000.c000.snappy.parquet |
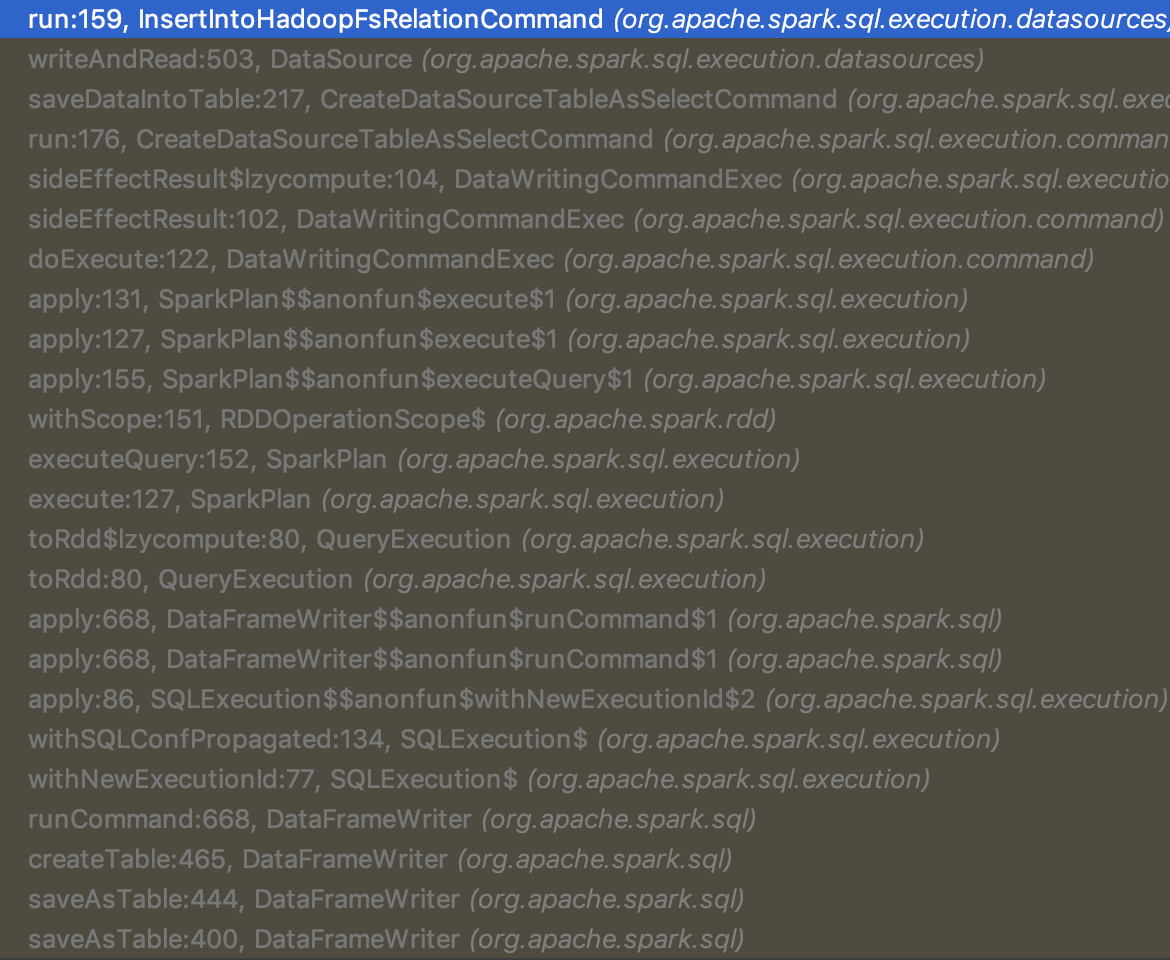
写入的流程比较杂, 后续会专门讲下, 文末贴了两张调用 debug 的图, 感兴趣的读者可以自己去追下, 虽然流程很长, 但是代码还是很简单的.
这里提下 buckId 是怎么加到文件上的: 在 DynamicPartitionDataWriter#newOutputWriter 中:
1 | // 所以可以看到最多五位数的 bucketId |
提一句, 其实如果你是 repartition 了之后存下来的, part- 后的数字也就是 hash 之后的值, 这个 task attempt ID 是之前 execute task 时传入的 sparkPartitionId, 代码在 FileFormatWriter#executeTask
1 | private def getFilename(taskContext: TaskAttemptContext, ext: String): String = { |
2. 优化: Bucket Pruning
对于点查, 还是上面 bucketBy id 的例子, 例如 id=5, 可以把id=5当做原始表中一条记录, 同样的我们可以计算出它的 hash 值, 得到它的 bucket ID, 那么我们只要扫这个 bucket ID 文件就可以了, 因为其他 bucket ID 的文件里肯定没有5这个元素.
2.1 Strategy 部分
先简单带过下 Spark read parquet 的流程, 想了解更多的可以参考这篇Spark Read Deep Dive .
Spark 具体读取底层数据文件的 SparkStrategy 叫做 FileSourceStrategy, 在其 apply 方法中我们可以看到他需要一个 LogicalRelation 来触发到 apply 方法中的各个逻辑: l @ LogicalRelation(fsRelation: HadoopFsRelation, _, table, _)) =>.
LogicalRelation 中最重要的是HadoopFsRelation, 我们也可以构造自己的 HadoopFsRelation 传入, 从而生成 DataFrame, 这里不展开:
1 | def baseRelationToDataFrame(baseRelation: BaseRelation): DataFrame = { |
提一句, Spark 的 partitionBy 的 pruning 通过 FileIndex, FileIndex 记录在 HadoopFsRelation 一路传到 FileSourceScanExec, FileSourceScanExec 里调用 FileIndex#listFiles pruning 文件, 但是 bucket 并不走 FileIndex 这一套, 事实上我觉得这两个逻辑是类似, 不知道为啥 Spark 不实现在一起, 有知道同学可以说下.
在 FileSourceStrategy#apply 中会对于可以进行 bucket pruning 的情况(bucketColumnNames.length == 1 && numBuckets > 1), 会传给FileSourceScanExec一个 bucketSet, 它是一个bitset, 通过这个 bucketSet 我们就能知道有哪些文件被选中了(010就代表第二个文件被选中了, 这个用法还是有点装逼).
下面来看看这个 bucketSet 是如何返回的, 代码如下:
1 |
|
最主要的逻辑在 FileSourceStrategy#getExpressionBuckets 中, 可以看到 bucket 的 pruning 只支持 Equality, In, InSet, IsNull (And/Or 也支持, 只不过 And/Or 的 left/right 也必须是前面的类型), 其他情况是不支持 pruning 的, 直接返回所有 buckets.
我们来看 Equality 情况的处理, 调用了 getBucketIdFromValue, 里面逻辑是使用 HashPartitioning 求出 filter 里 literal 的 hash 值. 直接把这个 hash 值写入bitset 就是 最后返回的 bucketSet (这里还搞了 InternalRow/UnsafeProjection, 主要是为了处理各个类型的 value)
这里需要注意的一点是, 如果你的 filter 是 cast(id as string)='1', 或者等号右边的不是一个 lit, 是没法做 pruning 的.
1 | // Given bucketColumn, numBuckets and value, returns the corresponding bucketId |
PS. 之前我们仿照这个 bucket pruning 写了一个 file index 的时候, 还踩了一个坑, 当时觉得 not 也是支持的, 本来是选中那个文件, not 的话就取反一下, 变成 pruning 掉那个文件. 但是其实是有问题的, 事实上, 所有的 pruning, 只要不是精确到每个值都做 index 的, not 的情况都不能支持, 举例来说, a != 5, 但是 a 可能等于除5之外的任何值, 你把包含5的文件去掉了, 但是这个文件里除了5的记录, 还有其他值的记录.
2.2 Exec 部分
Spark 用 Strategy 来构造 Exec 的, FileSourceStrategy 用来构造 FileSourceScanExec
在第一部分中, 我们传入了 bucketSet 给 FileSourceScanExec, 这个 bitset 告诉了我们要扫描哪些文件.
FileSourceScanExec 通过 inputRDD 暴露出数据给上层的算子, 所以说 Spark SQL 用的也是 RDD. inputRDD 有两种逻辑, 如果是 bucketing 的话, 会调用 FileSourceScanExec#createBucketedReadRDD.
createBucketedReadRDD 逻辑也很简单:
- 找到每个 partitions 里的所有文件(如果没有用 partitionBy 机制, selectedPartitions 就只会有一个)
- 找到每个文件对应的 bucketID(文件名里记录着, 正则匹配), group by 这个 ID, 得到类似 Map[bucketID, Arrar[file]] 这样的结构
- 只取出
bucketSet中记录了的 bucketID 对应的 files.
到这里, 就完成了 bucket pruning 的逻辑.
1 | private val bucketedFileName = """.*_(\d+)(?:\..*)?$""".r |
3. 优化: Bucket Join
3.1 概述
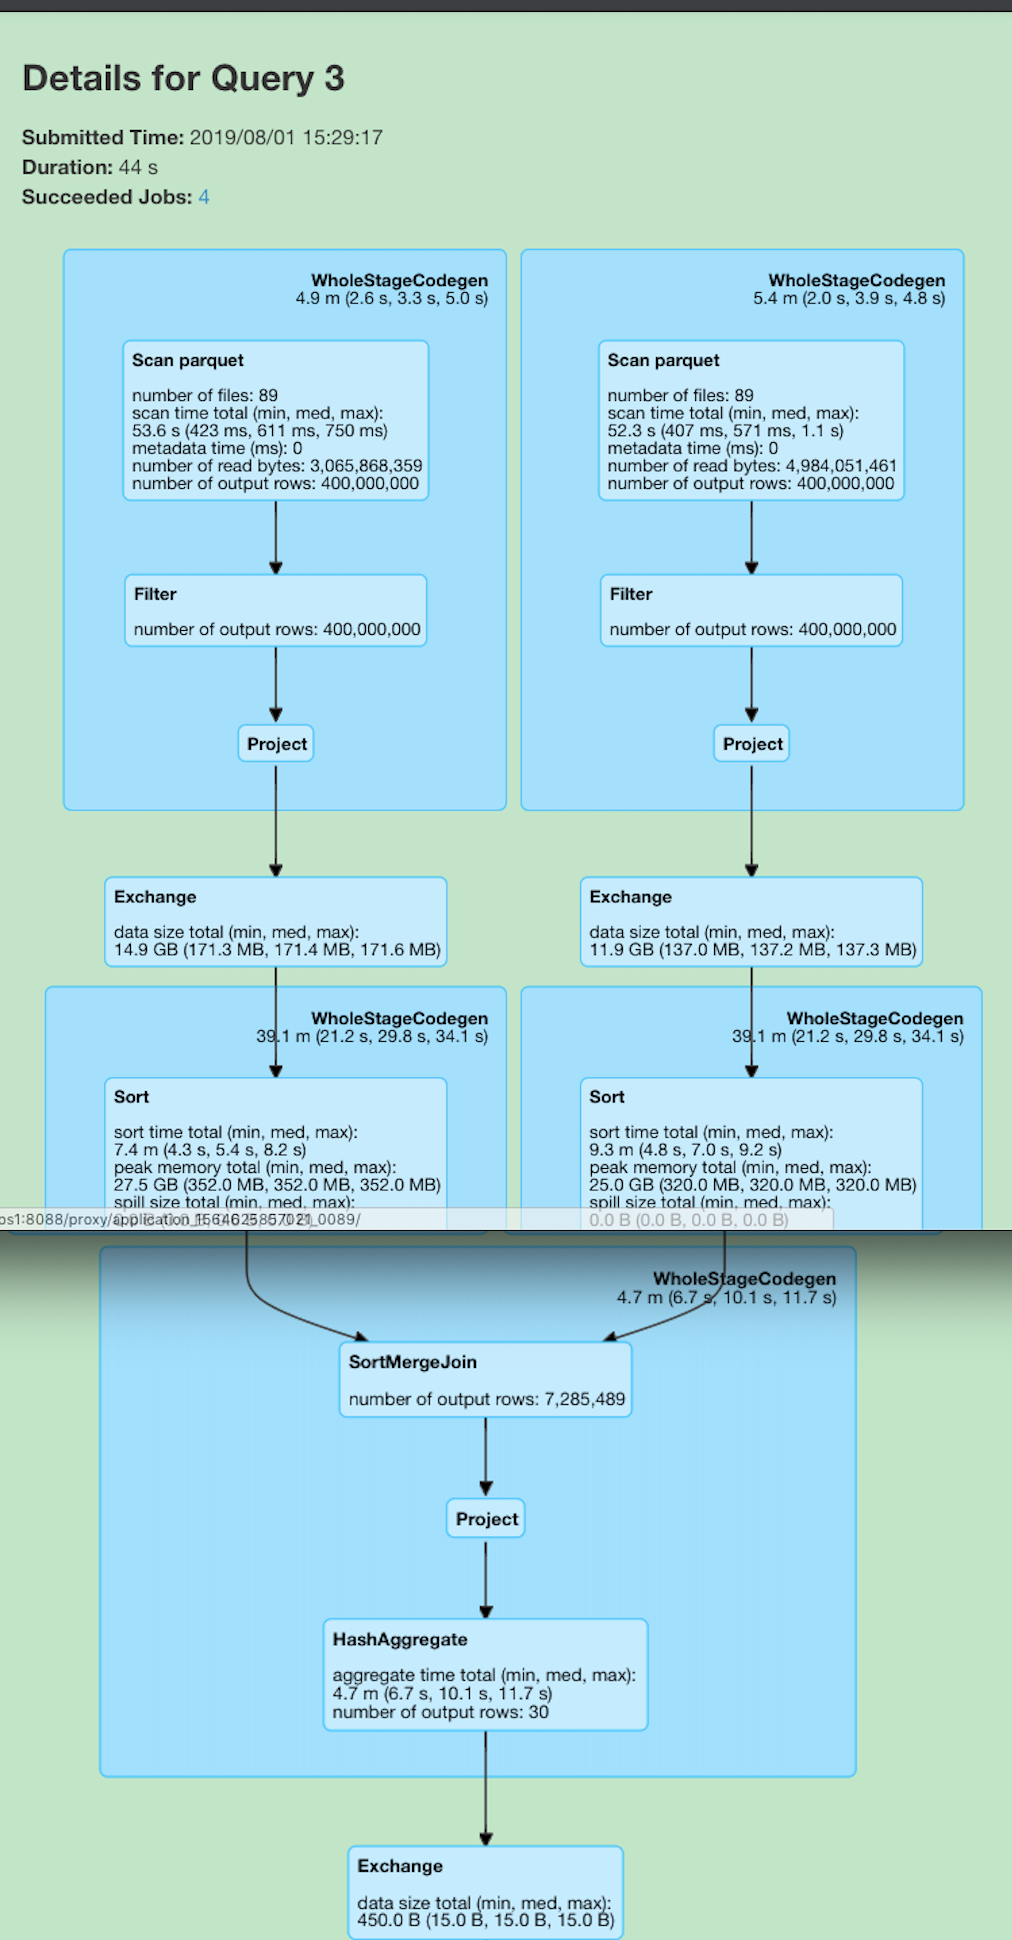
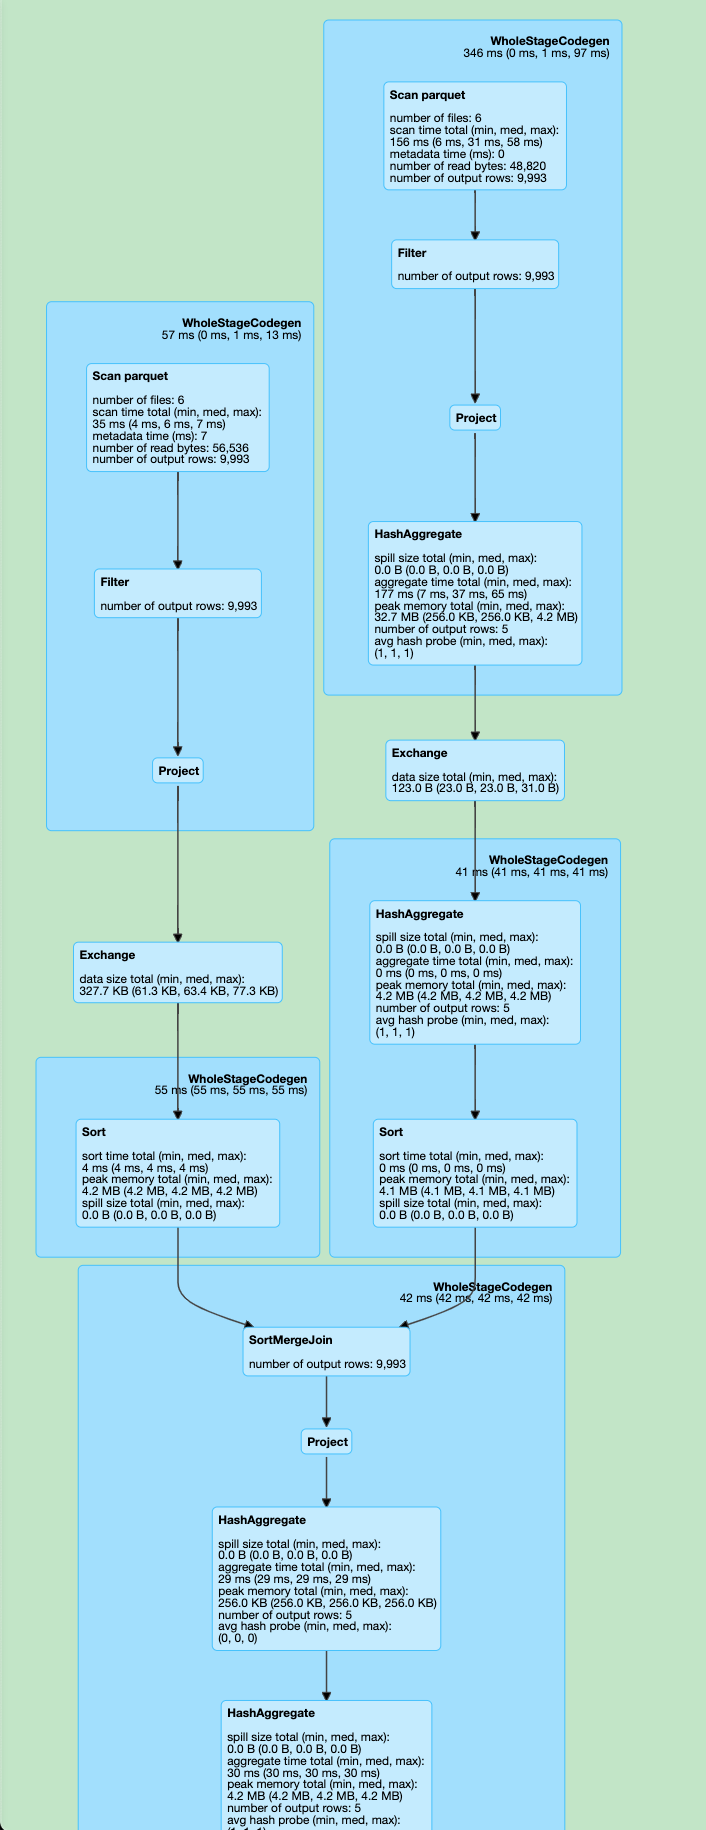
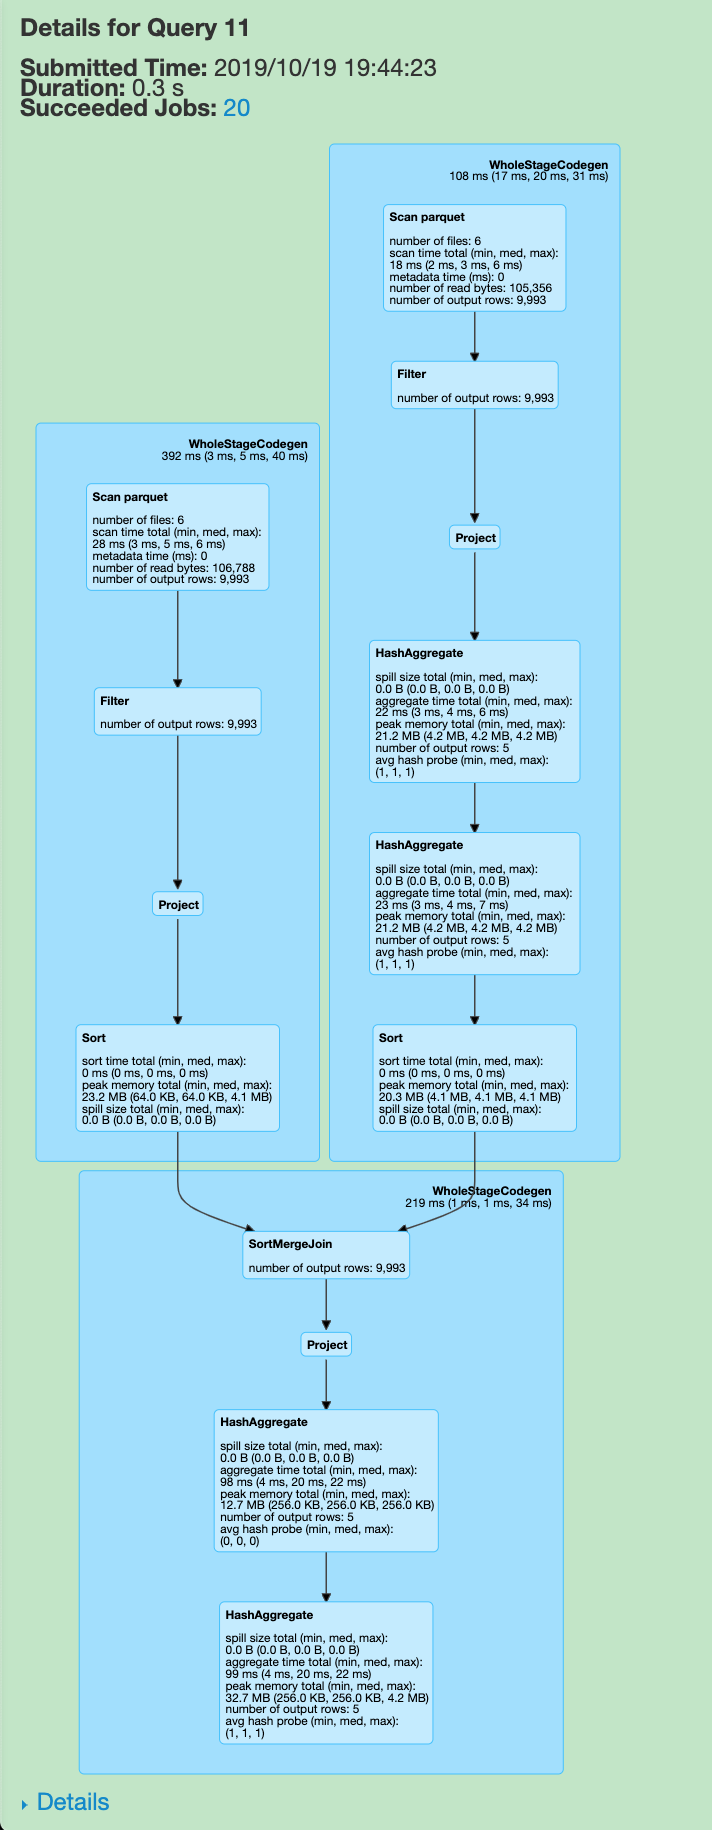
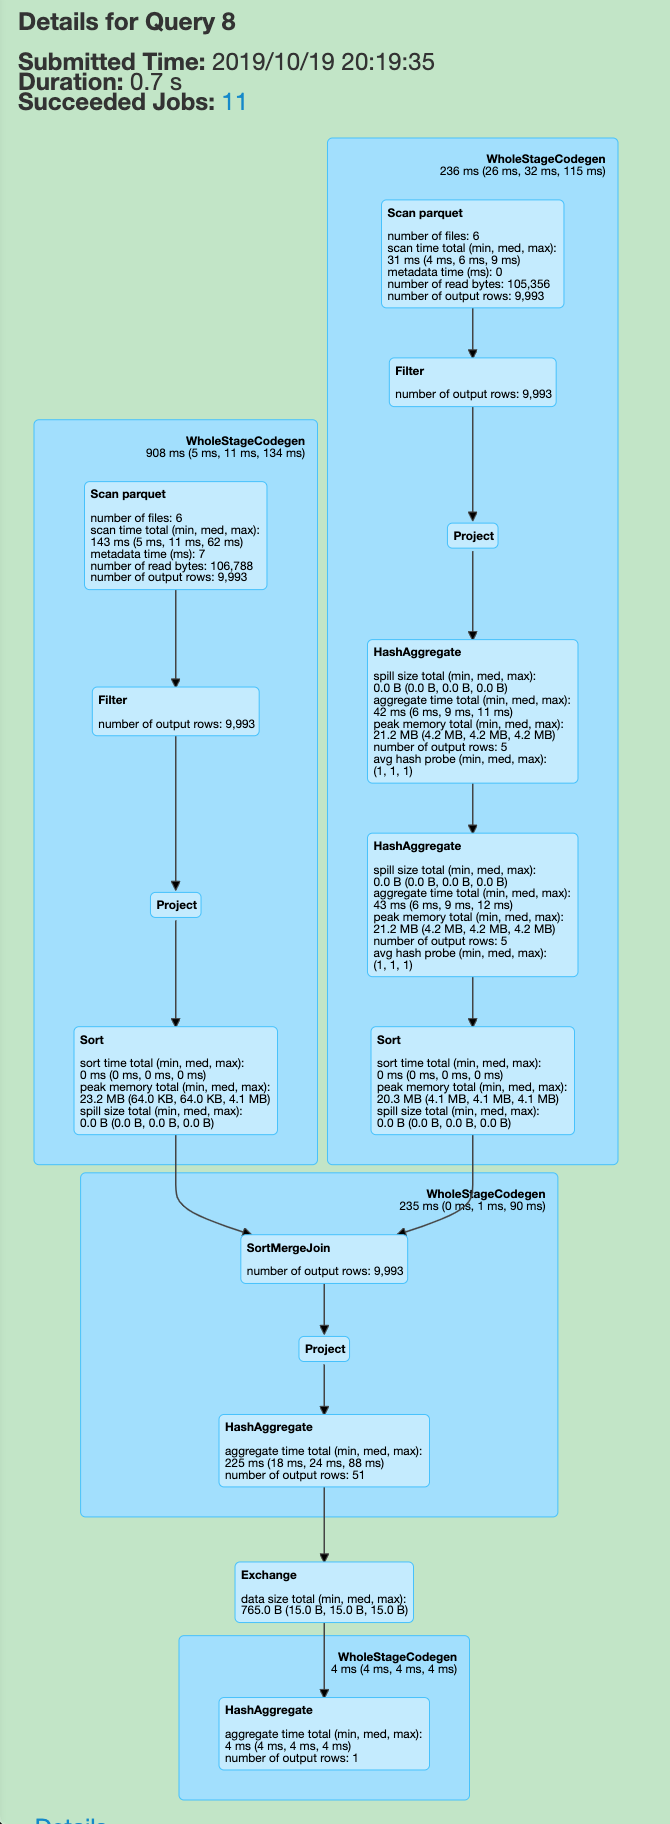
Bucket 还有一个很大的用处是可以用来做 Bucket Join, 这也是我觉得非常黑魔法的一个特性. 众所周知, SQL 的 join 是非常耗费时间的, Spark 为此也做了多种策略, 可以参考我之前的这篇博客 Spark SQL Join Deep Dive, 对于 大-大表进行 join, Spark 一般会选择 SortMergeJoin (SMJ), 因为SMJ 对比 HashJoin 来说, 不需要把一侧分片的数据都加载到内存中去, 提升了系统稳定性, 但是缺点是慢, 见下面两个例子:
例子一
这个是最简单一个例子, 两个表直接 join, 无子查询.
优化前
优化后

可以见到, 由于是一个 SMJ, 而我们的源表又没有任何处理, 所以 Spark 自动给执行计划上加上了几个 exchange(shuffle) 和 sort, 对大数据有点了解的同学都知道, 这两步操作会十分的耗费时间与资源. 而要是启用了 Bucket Join 之后, 执行计划图会变成什么样呢? 可以见下图, 可以见之前的 exchange 和 sort 都没有了, 整体 query 时间从 40s+ 下降到 5s(图一到图三).
例子二
我们来看更复杂的一个例子:
1 | SELECT COUNT(*) |
优化前
优化后
有意思的是, 去掉最后一个 group by, 执行图会变成这样, 这个就留给读者朋友们自己去想了.
3.2 原理说明
我们先来看下 SMJ 的原理:
- 为了让两条记录能连接到一起, 需要将具有相同 key 的记录分发到同一个分区, 这一步会导致 shuffle(Exchange).
- 分别对两个表中每个分区里的数据按照 key 进行 sort(SortExec), 然后后续做 merge sort 操作, 这样就可以不用像 HashJoin 需要把所有数据都拉到内存中.
那么 Spark 是怎么知道是否需要添加这两步操作的呢? 假如我原始数据已经按 key 进行过了 sort, 那么是不是可以省下后面的 sort? 我们来看 SortMergeJoinExec 的两个方法:
requiredChildDistribution: Seq[Distribution]:
HashClusteredDistribution(leftKeys) :: HashClusteredDistribution(rightKeys) :: Nil, SMJ 要求 Join 的两张表都是 HashClusteredDistribution 的requiredChildOrdering: Seq[SortOrder]:
leftKeys.map(SortOrder(_, Ascending)) :: rightKeys.map(SortOrder(_, Ascending)) :: Nil, SMJ 要求 Join 的两张表都是排序的
会在 EnsureRequirements#ensureDistributionAndOrdering 中判断一个节点的子节点是否符合上述的两个require:
1. 添加 exchange 节点
1 | children = children.zip(requiredChildDistributions).map { |
2. 添加 sort 节点
1 | children = children.zip(requiredChildOrderings).map { case (child, requiredOrdering) => |
2. 替换 children
1 | operator.withNewChildren(children) |
那么为何 bucketing 可以省略掉上面这两步呢? 答案就是使用了 bucketing 机制, FileSourceScanExec 会暴露 SMJ 需要的 Distribution 和 Ordering, 代码见FileSourceScanExec#val (outputPartitioning, outputOrdering): (Partitioning, Seq[SortOrder]):
需要注意的一点是, 当用了 partitionBy, 或者就是你的 DF 有多个 partition 时, 会每个 partition 都有 bucketNum 个文件 (防止write 的时候数据倾斜), 所以一个 bucketID 可能会对应多个文件, 这些文件自己是有序的, 但是合在一起是无序的, 所以 ordering 是 Nil.
1 | override lazy val (outputPartitioning, outputOrdering): (Partitioning, Seq[SortOrder]) = { |
优化 SMJ 条件
- Join 的列需要是 bucketBy/sortBy 的列, 且两边 bucketBy 的 num 要一样
- 如果有多个分区或者用了 partitionBy, Ordering 不能去除
问题
- DF 的每个 partition 都会有 bucket num 个文件, 比如
df.repartition(5).write.format("parquet").option("path", "/tmp/bueket").bucketBy(3, "id")会产生15个文件, 由于这个限制, 我们使用 repartition 重新实现了类似 bucket 的功能.
写入 debug 截图
TBD, 后面写个文章介绍